A deck railing isn’t just a legal requirement, it’s the frame around your outdoor living room. Whether you’re refreshing an aging wooden railing or building from scratch, modern deck railings offer homeowners a chance to blend safety, durability, and aesthetics in ways that weren’t practical even five years ago. From sleek metal-and-glass combinations that feel minimalist and contemporary to composite materials that eliminate endless repainting, the options have evolved far beyond the standard vertical spindle. This guide walks you through the material choices, code requirements, and installation basics so you can choose (or build) a railing that’ll last decades while actually looking like it belongs on your deck.
Table of Contents
ToggleKey Takeaways
- Modern deck railings combine safety, durability, and aesthetics through material choices like metal-and-glass combinations, composite systems, or traditional wood, each offering distinct advantages for contemporary outdoor living.
- Metal-and-glass railings provide unobstructed views at $40–$80 per linear foot, while composite options offer low-maintenance durability at $50–$90 per linear foot, with recycled content variants for eco-conscious homeowners.
- All deck railings must comply with IRC codes: heights between 36–42 inches, baluster spacing not exceeding 4 inches, and posts bolted (not screwed) to rim joists, with local jurisdictions potentially requiring permits.
- DIY installation requires precise measurements, chalk line layouts, bolted post anchors, and structural fasteners like 2½-inch screws or bolts, with wood railings demanding annual inspections and stain reapplication every 2–3 years.
- Maintenance varies by material: wood needs seasonal staining and annual checks for soft spots, composites require mild cleaning to prevent moisture buildup, and metal railings benefit from regular bolts checks and coastal weather rinsing.
Understanding Modern Railing Materials and Design Trends
Metal and Glass Combinations
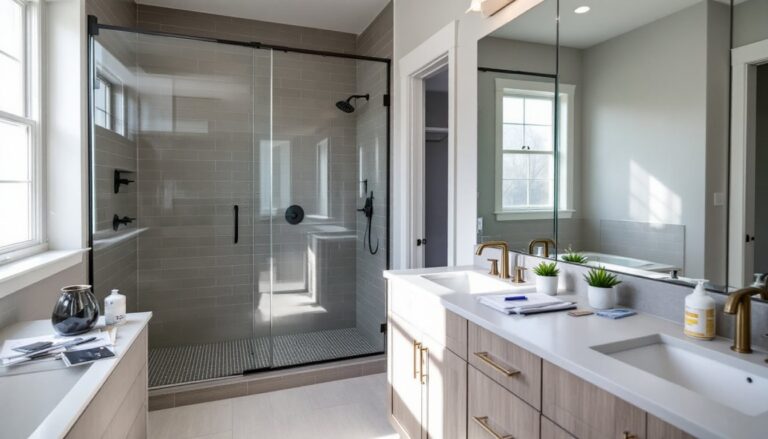
Aluminum and stainless steel railings paired with tempered glass panels have become the go-to for contemporary decks. Aluminum is lightweight, rust-resistant, and available in anodized finishes (black, bronze, or silver) that age gracefully. Stainless steel costs more but handles coastal environments without pitting. The glass, always tempered for safety, sits in aluminum or steel channels, giving you an unobstructed view while meeting code requirements. Posts still need to be 4×4 or 6×6 pressure-treated lumber (depending on span and load), but the infill panels do the heavy lifting on aesthetics.
The appeal is obvious: you’re not looking through spindles: you see your landscape. Installation requires precision, though. Glass panels must sit level, and channels need to be sealed properly so water doesn’t trap inside the aluminum frame and cause freeze-thaw damage. Costs run $40–$80 per linear foot for quality aluminum-and-glass systems, installed.
Composite and Sustainable Options
Composite railings (wood fiber mixed with plastic resin) have matured significantly. Brands like Trex and TimberTech now offer designs that don’t look plastic, matte finishes, wood grain textures, and neutral colors that complement modern and traditional decks alike. They’re low-maintenance: you won’t power-wash, sand, or stain them. Water and UV aren’t threats.
The catch? Composites cost $50–$90 per linear foot installed, and they can be harder to modify in the field. If you need a non-standard angle or opening, you’re often stuck with what the profile allows. Also, some composites can soften or warp in extreme heat (think 120°F+ direct sun), so ask for specs before committing.
For truly eco-minded builders, some composite brands now incorporate recycled plastic and reclaimed wood fiber. The real environmental win comes from durability: a 30-year lifespan versus repainting wood every 3–5 years. That said, verify recycled content claims: some manufacturers are vague about actual percentages.
Planning Your Deck Railing Project
Start with a site visit and clear measurements. Walk your deck perimeter and note transitions (where does the railing start and stop?), obstacles (posts in the way of a window view?), and slope (does your deck step up or down at any point?). Sketch it roughly and photograph problem areas.
Material choice drives everything downstream. If you’re going metal-and-glass, you’ll need a glass supplier and likely a professional installer, most homeowners don’t cut and fit tempered glass themselves. If you’re building traditional wood or installing composite panels, you can manage it with standard tools. Resources like Ana White offer detailed railing plans and design ideas for DIY builds.
Budget for posts, infill panels, fasteners, and sealer or stain if using wood. Don’t forget miscellaneous: lag bolts, shims, flashing tape, and primer. For composite or metal systems, ask suppliers if they include all hardware or if you’re sourcing caps and trim pieces separately. Order sample panels if possible, colors shift in different light, and you want confidence before committing 200 feet of rail.
Safety Standards and Building Codes
Modern deck railings must meet the International Residential Code (IRC) 302.4, which mandates railings on decks 30 inches or higher. Key specs: railings must be 36–42 inches high measured from the deck surface, and the top rail must resist a 200-pound horizontal load at any point. This is structural, not cosmetic, your railing is part of the deck’s lateral bracing.
Baluster spacing (the gap between vertical infill members) cannot exceed 4 inches. This sounds simple but is critical: the rule exists because a 4-inch sphere can’t pass through, preventing children from getting stuck or falling. If you’re using metal pickets or composite balusters, verify the spacing before installation. Glass railings typically satisfy this because solid panels don’t have gaps, confirm with your inspector.
Post spacing rarely exceeds 6 feet on center, and connections to the deck framing must be bolted, not just screwed. Local jurisdictions often add requirements (snow load on the top rail, for example, in cold climates), so contact your building department before starting. Some regions require a railing permit: others don’t. Don’t guess, a failed inspection wastes time and money. Hiring a professional for the structural connections (posts to the rim joist or header) is often money well spent if you’re unsure.
Installation Fundamentals for DIY Enthusiasts
Prep and Layout
Measure twice, mark once. Snap chalk lines along your deck edge where posts will sit, accounting for any steps or offsets. Use a 4-foot level to confirm the deck surface is reasonably level: if it slopes more than 1 inch per 8 feet, you’ll need wedge shims under posts.
Posts
Drill holes for post anchors (typically ½-inch bolts) into your rim joist or header beam, then secure 4×4 posts with bolts, washers, and lock nuts. Posts should stand plumb (use a level on two perpendicular faces). Install at 6-foot intervals (or per your code and plan). Don’t skimp on fasteners, they’re doing real work.
Rails and Infill
If you’re building wood, cut your top and bottom rails to length and attach them to posts with 2½-inch structural screws or bolts (never nails). Install balusters on 4-inch centers using 2-inch exterior-grade screws. Sand any rough edges, then apply a penetrating oil or composite exterior stain, not latex paint, which cracks when wood moves seasonally. Sunset magazine offers practical outdoor building guides with visual references for traditional and modern styles.
For composite systems, follow the manufacturer’s specs precisely. Profiles lock into channels, and over- or under-tightening fasteners can cause buckling or gaps. Use stainless steel fasteners to avoid rust staining.
Safety and Tools
Wear safety glasses when drilling or cutting, work gloves when handling raw lumber or metal, and a dust mask if you’re sanding. A power drill-driver, circular saw or miter saw for angled cuts, and a level are essentials. A drill with a countersink makes fastener holes look finished.
Maintenance and Long-Term Care
Wood railings require the most upkeep. Inspect annually for soft spots, splitting, or cracked finish. Reapply stain or oil every 2–3 years depending on exposure (sunny decks fade faster). Power washing helps, but use low pressure (1,500 psi max) to avoid splintering. In freeze-thaw climates, water trapped in fastener holes can cause splitting, small issues become big ones if ignored.
Composite railings need occasional cleaning. Use mild soap and water, never pressure washers. Some discoloration (fading, mildew on surfaces not in direct sun) is normal and not a defect. Trim vegetation that shades the railing: poor air circulation traps moisture.
Metal railings with glass benefit from regular glass cleaning and occasional wiping of frames to remove debris. Anodized aluminum is durable but scratches will show, that’s not failure, just patina. Stainless steel stays shinier longer but should be rinsed after salty or coastal weather.
Yearly, walk the perimeter and check for loose bolts (tighten if needed), rust spots, or movement. Squeaks or slight give at post connections means fasteners need attention. Catching minor issues early beats emergency rerailing later.